RSS

Category Archives: Uncategorized

Somewhat about Tevent Context!

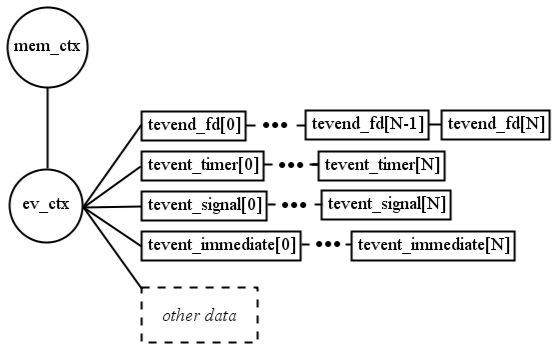
Tevent context is a handler that describes an instance of the ‘tevent’ event library. Thus to work with this, first we need to allocate some memory say “memctx”. Now that we have space allocated, we will put our tevent_ctx pointer here. To deal with the events to be caught and handled they are first required to be included in this particular context. Reason for subordinating events to a tevent context structure rises from the fact that several context can be created and each of them are processed at different time. Thus we can maintain different context for different events. For example: we can have one context containing just file descriptor events, secondone taking care of signal and time events and the third one which keeps information about the rest etc.

// A little example:

TALLOC_CTX *memctx = talloc_new(NULL);
assert_non_null(memctx, NULL);
struct tevent_context *ev_ctx = tevent_context_init(memctx);
assert_non_null(ev_ctx, NULL);

The Diagram below explains the idea clearly: Taken from the source mentioned below.

tevent_context_stucture.png

Source : https://tevent.samba.org/tevent_tutorial.html

 
Leave a comment

Posted by on January 26, 2014 in Uncategorized


Negative Cache

My last module work was on negative cache. While writing unit test for the module I gathered some knowledge about negative caching. Let us have a brief look into it!

Simple Defination:

DNS caching of unsuccessful name resolution attempts is called negative caching.

Elaboration:

Let us understand it more elaborately. Resolver receives positive or negative responses to different queries. Accordingly it adds the respective response to its cache. The resolver always checks the cache before querying any DNS servers. If a name is in the cache, the resolver uses the name from the cache rather than querying a server. Since there is no resource record for an invalid name the server itself must decide how long to cache this negative information. Thus if a negative response is cached for a query it does not try to resolve it later rather sends the same response as a result of the query asked again.

Use of Negative Cache:

Negative caching is useful as it reduces the response time for negative answers. It also reduces the number of messages that have to be sent between resolvers and name servers hence overall network traffic. A large proportion of DNS traffic on the Internet could be eliminated if all resolvers implemented negative caching.

The ISPs which have multiple DNS servers take advantage of negative response and other response type cached to distinguish between different DNS servers. The failed DNS entry remains as long as the TTL is set. After TTL, DNS server is requeried because after this particular time limit the response entry will be dropped from the cache. But, the negative response still persists in the cache. That negative response prevents the machine from asking that particular DNS server, and instead it asks another server. This prevents a timeout error if that machine fails to respond. Even the negative response will be dropped later. Later DNS server which issued negative response may update itself by then.


Leave a comment

Posted by on January 10, 2014 in Uncategorized


It is always good to have backup!

I am sure many of you are familiar with Git version control system and github. Still I wish to share some very basic steps to keep a backup of your data. To put your data on github.com

Firstly you need to have an account on github.com.

1) This step is very simple. Just go to github.com and make an account by signing in there.

2) Just beside your username you can find a symbol, which helps you make you repository. Click on the icon. Write the name of the repository in the space provided under title “Repository name”, say SSSD. You can also write a simple description about the repository in the space provided under title “Description”.

3) Click on the button named “create repository” once 1 and 2(optional) step(s) are done.

Secondly you need to be familiar with some basic git commands. Lets us try putting a file on github.com as an example to understand it better.

1) Go to your terminal. Type : sudo yum install git (for fedora distribution) or type: sudo apt-get install git (for ubuntu users)

2) Now let us configure it.

git config –global user.name “user name”

git config –global user.email “email@whatever.com”

git config –global color.ui auto

3) Let us make a directory where we will have our file.

mkdir dir_name (say,  mkdir testgit)

4) Type command : cd dir_name (say, cd testgit) and get into the directory.

5) Here one thing is to be done. We need to initiate a git repository to have git discovery across file  systems.

So type the command : git init dir_name (say, git init trygit)

This command creates an empty Git repository – basically a .git directory with subdirectories for objects, refs/heads, refs/tags, and template files. An initial HEAD file that references the HEAD of the master branch is also created. More reference can be found here : http://git-scm.com/docs/git-init

cd dir_name (here in our example it is: cd trygit).

6) Let us now make our file. This is made inside “trygit” directory.

type: vi filename.txt2 (say, test2.txt)

7) Write some text (say, hello world) in file and save it.

See the status by typing: git status

you will see some msg like this:

#   Untracked files:
#   (use “git add <file>…” to include in what will be committed)
#
#   test2.txt

8) Once you make a file you need to add it keep track of your file and its changes.

To add file type: git add filename (say, git add test1.txt).

After adding you can see the status by typing: git status . The will see msg like this:

# On branch master
# Changes to be committed:
#   (use “git reset HEAD …” to unstage)
#
#    new file:   test1.txt

9) Now we are going to commit the file.

type: git commit filename.txt (say, git commit test1.txt)

After this, a file will open where you can write a message and save it. Later you will see something like   this on terminal

[master a98588d] testing git
1 file changed, 0 insertions(+), 0 deletions(-)
create mode 100644 test1.txt

10) You can see all the the commits by using command: git log

11) Now let us push the file.

type: git push -u where what

“where” is the place you what to push the data. So for this copy paste the url where you had created the git repository on github.com.

“what” is, what you are pushing. Here in our example it is master.

so the command for this example will be: git push https://github.com/your_git_username/trygit.git master

Note: The name of repository can be different from the one we initiated in step 5.

12) As soon you are done with step 11 you will be asked for github.com username and password. Enter both and yipee we are done 🙂

Now you can check the pushed file in your repository on github 🙂

CONCLUSION:

If you want to add some more files in the same repository just clone the repository and follow the same steps as mentioned above. In short:

1. git clone https://github.com/your_git_username/repository_created

2. Then add all the patch files to your cloned repo

git add *filenames

3. Then commit

git commit *filenames

4. Then push

git push where what

i.e git push https://github.com/your_git_username/repository_created master

Done! 🙂 🙂
 
1 Comment

Posted by on December 27, 2013 in Uncategorized


Getting selected for Outreach Program for Women (December2013- March2014)

I am bit late in posting this beautiful news :). As its said “better to be late than never” let me share one of the best experience of my life. I came to know about OPW and it seemed very interesting.

1) Searching about all the participating organizations, https://wiki.gnome.org/OutreachProgramForWomen

2) Going through projects on different platform. Selecting project.

https://wiki.gnome.org/OutreachProgramForWomen/2013/DecemberMarch#Participating_Organizations

3) Talking about project on their respective IRC(Internet Relay Chat).

4) Getting mentor , getting his/her guidance (actually most of the IRC folk help as much as they can, that was the most appealing thing which stuck me about IRC).

This year I had applied to the same taking Fedora as my project organization. Name of my project is “unit test SSSD”, references to which are:

a) https://fedorahosted.org/sssd/

b) https://fedorahosted.org/sssd/wiki/DesignDocs/TestCoverage

I was really lucky to have Jakub Hrozek, https://fedoraproject.org/wiki/User:Jhrozek as my mentor. He is very good and approachable. I could do my initial contribution to the project very efficiently with his guidance. Marina Zhurakhinskaya , Lukas Slebodnik, Sumit Bose and whole team of Fedora as well as Gnome were really helpful. Getting into OPW means a lot to me. I am sure to learn a lot (which I am!!). At the same time I wish to be an asset to the organization. Right now I am working on my December task. Will share more about the project in the next blog…. 🙂

 
1 Comment

Posted by on December 22, 2013 in Uncategorized


Building SSSD

Follow the given steps to build SSSD ( System Security Services Daemon ):

Step 1:

We need to install following packages in order to proceed

yum install gettext gettext-devel libtool pcre-devel c-ares-devel \
    python-devel popt-devel doxygen bind-utils libnl3-devel \
    samba-devel glib2-devel dbus-devel libxslt docbook-style-xsl \
    nspr-devel libxml2 \
    libtevent libtevent-devel libtalloc libtalloc-devel \
    libtdb libtdb-devel libldb libldb-devel \
    libselinux-devel libsemanage-devel \
    nss-devel pam-devel openldap-devel krb5-devel \
    check-devel libcmocka-devel \
    libcollection-devel libdhash-devel libini_config-devel \
    libpath_utils-devel libref_array-devel cifs-utils-devel \
    systemd-devel

Step 2:

Open ~/.bashrc file. Now, in order to make it convenient to work on SSSD often , add the following lines to your ~/.bashrc file.

if [ -f /path/to/sssd-source/contrib/fedora/bashrc_sssd ]; then
    . /path/to/sssd-source/contrib/fedora/bashrc_sssd
fi

Step 3:

Run the following command to produce a Debug build of SSSD

cd /path/to/sssd-source
reconfig && chmake

Step 4:

Run the usual Autotools combo to install SSSD on distribution other than Fedora system :

autoreconf -i -f && \
./configure --enable-nsslibdir=/lib64 --enable-pammoddir=/lib64/security && \
make
sudo make install

Things to be taken care:

* The Autotools install prefix is /usr/local

* Use /lib instead of /lib64 for nsslibdir and pammoddir while building and installing on a 32 bit machine.

* The NSS and PAM libraries must be installed to system library directories as that’s where NSS and PAM look for them.

And that is it. We are done.

 
2 Comments

Posted by on October 25, 2013 in Uncategorized


Run Ubuntu 12.04 within VMPlayer on Linux

Let us play with Ubuntu 12.04 in VMPlayer on Linux this time:

First, we need to download VMPlayer in our system. Go to the link http://www.vmware.com/products/player/ now click on “Downloads”, you will get a list of items with sub headings. Scroll down and go to “Desktop & End-User Computing”. Click on “Download Product” mentioned in front of “VMware Player”.

VMPlayer Setup:

Now, open VMPlayer. Click on “Create a New Virtual Machine”. Click on “Use an ISO image”. Browse your Ubuntu 12.04 ISO image and click “next”. Fill in your computer details – username and password then click “next”.

Next page demands hardware information. Adjust size (in GB) accordingly. Then check mark “Store virtual disk as a single file”. It gives convenience while copying VM image from one system to other. Now uncheck “Automatically Start the VM” and click “finish”.

Now, before we should adjust emulated hardware. Click “Edit virtual machine settings”. Now adjust the amount of memory available to the VM to be the recommended amount of memory. Number of CPU should not be more than the number of CPUs you have available in your system. Click the ‘Save’ button.

Now we are almost done. Start the VM by clicking “Play virtual machine”. If a “Removable devices” window pops up, click “ok”. To avoid slow working of VM do click on “Download and install” for windows with heading Software “Updates”.

Yes we are done! As the installation of Ubuntu 12.04 finishes we can get started with it in our VM.

 
Leave a comment

Posted by on October 22, 2013 in Uncategorized


Get your wired connection eth0 detected in ubuntu 12.04

Here are some simple steps to follow to get your wired connection displayed on your the machine interface.

Step 1. Download suitable driver from following link

http://linuxwireless.org/download/compat-wireless-2.6/ . Well in my case I downloaded compat-wireless-2012-07-03-pc.tar.bz2  which worked for me.

Step 2.

Copy the .tar file in your home directory. Now we need to extract the downloaded file. Copy past following command in your terminal and press enter.

tar -xvf compat-wireless-2012-07-03-pc.tar.bz2 (since I downloaded this file. If your file is different change the name accordingly. )

Step 3.

Now copy paste the following command one by one in your terminal:

cd compat-wireless-2012-07-03-pc
scripts/driver-select alx
make
sudo make install
sudo modprobe alx

And thats all. 🙂 Now you should be able to connect Internet using wired connection. You can see your LAN mac address on terminal by typing the following command:

ifconfig

Get going 🙂

 
Leave a comment

Posted by on July 23, 2013 in Uncategorized


Enjoy clean Gmail

It is very annoying to find all, important and insignificant mails mixed all together. There are various ways by which you can distinguish between one type of mail to others. One of the way is to keep different colour to distinguish between different levels of importance among mails. But if you want to separate one set of mails from another then creating “Filter” is one good option. It makes our job easy to check all the mails under a particular mailing address and is very easy to create too.

Step 1.  Login to your Gmail account by proving your username and password.

Step 2. Open one of the email (emails with the similar email address from the sender will be put into the filter you are about to create.). Now click on the tab named “More”, scroll down and click on “Filter messages like these”.

Step 3. Now you need to fill some fields. Enter the email address of the sender (the email address from whom the messages are to be filtered) into the “from” field (here the address will be selected on its own by default). After doing this click on “Create filter with this search”.

Step 4. Now go to “Apply label” and then click on to “choose label”. Under this select “New label” and name it according to your wish and then press on “Create”. For example: if these mails are coming from a particular mailing list say “xyz” then name it accordingly.

By now you will get a message saying “A label “xyz” was created” Hola 🙂 and we are done.

 
Leave a comment

Posted by on February 23, 2013 in Uncategorized


Ops I am hungry

Usually it does not matter much to me if I skip my food. But skipping breakfast is one thing I usually regret. Not because “we should not skip breakfast” but since I wont be able to concentrate on things properly 🙂 The full concentration gets deviated to 🙂 As today is one among the days I showed my laziness to get up and now its 11.45 am only, still one more hour to wait. Its not just me but many of my fellow mates too face the same when they trace the same track 🙂

Well while realizing this fact I am remembering one of the chapter from Budhacharit (one of my Hindi supplementary text book which had complete biography of Gautham Budha). While he was on his course of realization he was trying all possible ways to do Sadhana. Some Saint use to do Sadhana by diving deep in water and staying there, some used to stand on one foot, some used to sit in middle of burning circle. One among them was to do sadhana without having any edibles. He too decided not to have any food and strive in order to follow practices. As days were going on his health started deteriorating. His bright face started becoming dull, his body became thin and he looked very frail but the glitter of the eye was still same (always in search of ‘The Truth’). After some days he realized following this is anyhow not quenching his anxiety rather is of no use. He got up and started walking. One of the lady of the province where this divine soul happened to stay was coming from somewhere. Budha ji went to this Devi and asked to offer him with some food. She immediately left and brought a bowl of milk made semi liquid sweet(in Hindi -Kheer). He gracefully drank that and humbly thanked the lady. Then he said one thing that “it is never useful to follow something which does not give you satisfaction”. Since, once you are satisfied by yourself you can over take anything and get successful rather then making yourself suffer. Suffering even becomes pleasure when an individual starts relishing it. So it completely depends on us to take our own way and proceed. Following this incident Budha ji was famously seated under the tree (known as Bodh tree now) where he vowed never to arise until he had found the truth.

Even I was feeling the same, once I want to concentrate on a particular thing, rather than ignoring the distractions its better to give solution to those distractions. That is one of the broad minded conclusion I was trying to take out 😛 Hey its almost time I will go and grab some stuff :)… Hope you people do not follow this bad practice of skipping breakfast. 🙂

 
Leave a comment

Posted by on January 22, 2013 in Uncategorized


PostgresSQL for Ubuntu

PostgreSQL even called simply Postgres, is an object-relational database management system (ORDBMS) available for many platforms such as Linux, FreeBSD, Solaris, Microsoft Windows, Mac OS X etc. It is a free and open source software.It is released under the PostgreSQL License, which is an MIT-style license.

And to have this software in your Ubuntu lets start with preparing the system.

1. First you need to install required libs from the following command:

sudo apt-get install libpq-dev

2. Open the terminal and run the following commands:

sudo add-apt-repository ppa:pitti/postgresql
sudo apt-get update
sudo apt-get install postgresql-9.2

Now we are ready to  Setup a Local PostgreSQL and pgAdmin. now we need to reset the password for the ‘postgres’ admin account for the server.Try to keep a strong password. Replace ‘password’ with the password you want to have. Run the following commands:

sudo su postgres -c “psql template1”
template1=# ALTER USER postgres WITH PASSWORD ‘password’;
template1=# \q

for version 8.4

sudo -u postgres psql postgres
psql (8.4.4)
Type “help” for help.

and then run the following commands:

postgres=# \password postgres
Enter new password:
Enter it again:

postgres=# \q

That alters the password within the database, now we need to do the same for the unix user ‘postgres’. Make sure you use the password you entered inside of psql.

sudo passwd -d postgres
sudo su postgres -c passwd

Restart the PostgreSQL server.

sudo /etc/init.d/postgresql-8.3 restart

If you are done till now then yipee we are ready to use both pgAdmin and command-line access (as the postgres user) to run the database server.Hope It will be beneficial for you.Lets get started…:)

 
Leave a comment

Posted by on January 20, 2013 in Uncategorized